Read through the easy steps in this Quick Tip to create a Minimalistic SandClock with ActionScript.
Final Result Preview
Let's take a look at the final result we will be working towards:
Step 1: Brief Overview
Using Arrays and a premade square MovieClip we will create a SandClock that will be animated by a Timer.
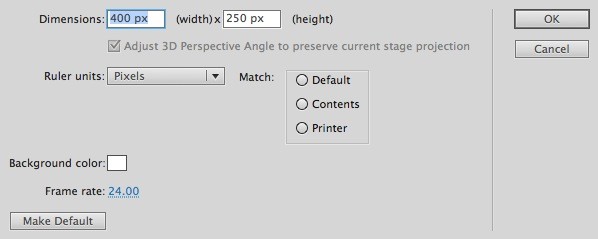
Step 2: Set Up Your Flash File
Launch Flash and create a new Flash Document, set the stage size to 400x250px and the frame rate to 24fps.
Step 3: Interface

This is the interface we'll be using, the squares in the image are actually one single blue square MovieClip exported for use with ActionScript, with a linkage name of Square. A simple button named startButton will be used to build and start the clock.
Step 4: ActionScript
Create a new ActionScript Class (Cmd+N), save the file as Main.as and write the following lines. Read through the comments in the code in order to fully understand the class behavior.
package
{
	import flash.display.Sprite;
	import flash.utils.Timer;
	import flash.events.TimerEvent;
	import flash.events.MouseEvent;

	public class Main extends Sprite
	{
		private var clockArray:Array = [15,13,11,9,7,3,1];//Stores the number of squares per line
		private var top:Array = []; //will hold the squares on the top part of the sandclock
		private var container:Sprite = new Sprite(); //stores all the movieclips
		private var containerCopy:Sprite = new Sprite(); //will duplicate the top part to make the bottom
		private var timer:Timer = new Timer(1000); //a timer executed every second
		private var counter:int = 0; //will count the seconds, used to stop the timer

		public function Main():void
		{
			startButton.addEventListener(MouseEvent.MOUSE_UP, buildClock);//a listener in the start button
		}

		private function buildClock(e:MouseEvent):void
		{
			startButton.removeEventListener(MouseEvent.MOUSE_UP, buildClock); //disables the button
			startButton.enabled = false;

			var clockLength:int = clockArray.length;

			/* this double for browses through the clock array length AND the value of each array element
				creating 7 lines (length) of squares with 15, 13, 11(element value) and so on  */

			for (var i:int = 0; i < clockLength; i++)
			{
				for (var j:int = 0; j < clockArray[i]; j++)
				{
					var s:Square = new Square();
					var sc:Square = new Square();

					s.x = 70.5 + (s.width * j) + (1 * j) + (i * (s.width + 1));
					s.y = 84.5 + (s.height + 1) * i;
					sc.x = s.x;
					sc.y = s.y;

					if (i >= 5)
					{
						s.x = 70.5 + (s.width * j) + (1 * j) + (i * ((s.width) + 1)) + (s.width * 2 - 4);
						sc.x = s.x;
					}

					container.addChild(s);
					containerCopy.addChild(sc); //creates a copy for the bottom part

					top.push(s);
					sc.alpha = 0.2; //makes the bottom part semi transparent
				}

				addChild(container);

				containerCopy.x = 225; //positions and rotates the bottom part
				containerCopy.y = 247;
				containerCopy.rotation = 180;

				addChild(containerCopy);
			}

			timer.addEventListener(TimerEvent.TIMER, startClock); //start the timer
			timer.start();
		}

		/* this function executes every second, it changes the alpha of the corresponding square to make the sand effect.
			when the time is done stops the timer and calls a function */

		private function startClock(e:TimerEvent):void
		{
			container.getChildAt(counter).alpha = 0.2;
			containerCopy.getChildAt(counter).alpha = 1;
			counter++;

			//60 seconds

			if (counter >= 59)
			{
				timer.stop();
				timer.removeEventListener(TimerEvent.TIMER, startClock);
				timeComplete();
			}
		}

		private function timeComplete():void
		{
			//do something here
		}
	}
}
You can adjust the Timer and the counter value to make the sandclock duration greater or shorter.
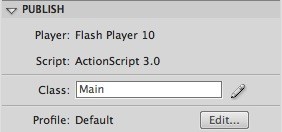
Step 5: Document Class
Remember to add the class name to the Class field in the Publish section of the Properties panel.
Conclusion
Why not use this SandClock to give your application or game a nice touch?
I hope you liked this tutorial, thank you for reading!

Comments