In the previous part of this tutorial series, we implemented the edit and delete post functionality in the welcome page. In this part of the tutorial, we'll add a Ladda loading indicator into our application. Adding a loading indicator is quite essential as it makes the application more interactive. We'll also fix a couple of minor issues as the tutorial progresses.
Getting Started
Let's start by cloning the previous part of the tutorial from GitHub.
git clone https://github.com/jay3dec/AngularJS_Firebase_Part6.git
After cloning the source code, navigate to the project directory and install the required dependencies.
cd AngularJS_Firebase_Part6
npm install
Once the dependencies are installed, start the server.
npm start
Point your browser to http://localhost:8000/app/#/home and you should have the application running.
Adding a Ladda Loading Indicator
Ladda is a UI concept which merges a loading indicator into buttons, making it interactive and user-friendly. From the official Ladda site,
A UI concept which merges loading indicators into the action that invoked them. Primarily intended for use with forms where it gives users immediate feedback upon submit rather than leaving them wondering while the browser does its thing.
Creating a Directive for Ladda
In order to use Ladda in our application, we'll create an AngularJS directive for the Ladda loading indicator. Directives are one of the core features of AngularJS, and they control the rendering of HTML inside the application.
Open up app/home/home.js and create a simple directive as shown below:
.directive('laddaLoading', [
    function() {
        return {
            link: function(scope, element, attrs) {

            }
        };
    }
]);
We'll start and stop the Ladda loading indicator based on a $scope variable called login.loading. When login.loading is true, we'll show the loading indicator, and when it's false we'll stop the loading indicator. So, in HomeCtrl, define a variable called login and assign it to the $scope.login variable.
var login = {};

$scope.login = login;
Next include the CSS and JavaScript files from ladda dist in home/home.html as shown below:
<script type="text/javascript" src="spin.min.js"></script>
<script type="text/javascript" src="ladda.min.js"></script>
<link href="ladda-themeless.min.css" rel="stylesheet">
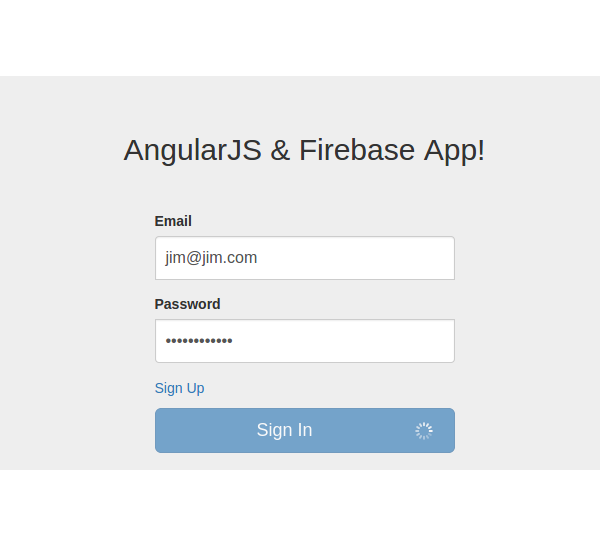
After adding the above script and style references, modify the Sign In button in home.html as shown:
<button ladda-loading="login.loading" data-style="expand-right" ng-disabled="!user.email || !user.password" type="button" ng-click="SignIn($event)" class="btn btn-lg segoe-ui-light ladda-button btn-primary btn-block"><span class="ladda-label">Sign In</span></button>
As you can see in the above code, we have added the directive laddaLoading to the button and have passed login.loading. We'll set and reset the passed in login.loading to toggle the loading indicator display. We have also added certain styles, segoe-ui-light and ladda-button, to style the Ladda loading indicators.
Now inside the directive link function, add the following code to keep a watch on the login.loading scope variable and start and stop the indicator accordingly.
.directive('laddaLoading', [
    function() {
        return {
            link: function(scope, element, attrs) {
                var Ladda = window.Ladda;
                var ladda = Ladda.create(element[0]);
                // Watching login.loading for change
                scope.$watch(attrs.laddaLoading, function(newVal, oldVal) {
                    // Based on the value start and stop the indicator
                    if (newVal) {
                        ladda.start();
                    } else {
                        ladda.stop();
                    }
                });
            }
        };
    }
]);
Next, when the user clicks the Sign In button we need to set the loading indicator. So, in HomeCtrl inside the SignIn function, set login.loading to true to start the loading indicator.
login.loading = true;
Similarly when the sign-in success or failure callback is called, we need to set the login.loading to false to stop the loading indicator.
login.loading = false;
Save all the changes and restart the server. Enter a valid email address and password and you should be able to see the loading indicator in action.
Similarly, we can add the ladda loading indicator for the Register button in register/register.html. Include the required references in register/register.html as shown:
<script type="text/javascript" src="spin.min.js"></script>
<script type="text/javascript" src="ladda.min.js"></script>
<link href="ladda-themeless.min.css" rel="stylesheet">
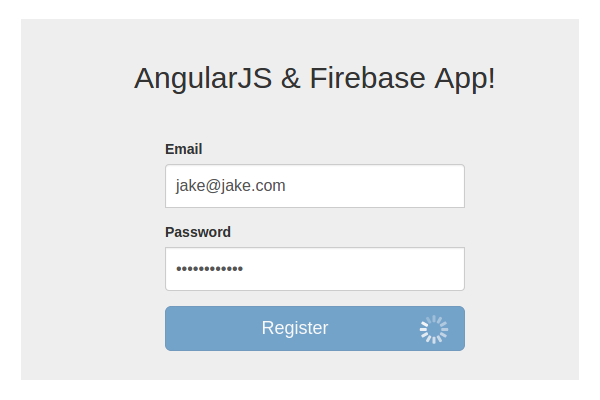
Modify the Register button to include the directive as shown:
<button type="button" ladda-loading="login.loading" data-style="expand-right" ng-click="signUp();" ng-disabled="!user.email || !user.password" class="btn btn-lg segoe-ui-light ladda-button btn-primary btn-block">Register</button>
Inside the RegisterCtrl add the login variable to set and reset the Ladda loading indicator.
 var login={};
$scope.login=login;
Now, to enable the loading indicator when the user clicks the Register button, add the following code to the signUp function.
login.loading = true;
To disable the loading indicator, on success or failure callback add the following code.
login.loading = false;
Save all the changes and try to register for a new account. On clicking the Register button you should be able to see the loading indicator.
Similarly, we can add the loading indicator to the Add post page too. It's exactly the same so I won't be repeating it again. If you get stuck, do have a look at the source code at the end of this tutorial.
Filter Articles in the Welcome Page
At this point any logged-in user can add, edit and delete all the posts in the application. But it's not really fair to allow a user to modify any other user's post. So we'll filter the posts displayed on the welcome page and show only those posts which were created by the particular user.
To query a data from Firebase we can use the startAt and endAt API. Using startAt and endAt we can fetch results with the specified starting point and ending point. But the data that we would be passing with startAt should be a priority. So first we'll need to set the email address as a priority while pushing the data to Firebase.
So, open up addPost/addPost.js and have a look at portion where we push the data to Firebase.
fb.$push({ title: title,post: post,emailId: CommonProp.getUser() }).then(function(ref) {
      	console.log(ref);
		$location.path('/welcome');
	}, function(error) {
  		console.log("Error:", error);
	});
Modify the above code to set the email address as a priority while pushing the data.
var user = CommonProp.getUser();


fb.$push({
    title: title,
    post: post,
    emailId: user,
    '.priority': user
}).then(function(ref) {
    console.log(ref);
    $location.path('/welcome');
}, function(error) {
    console.log("Error:", error);
});
So now if we add a post in our application it's added with a priority for email address. Next, open up welcome/welcome.js and have a look at the portion where we are creating the $firebase object in WelcomeCtrl.
var sync = $firebase(firebaseObj);
Modify the above code by adding the startAt and endAt methods to the firebaseObj.
var sync = $firebase(firebaseObj.startAt($scope.username).endAt($scope.username));
Now, it will return only the posts added by a particular logged-in user.
Save the above changes and restart the server. Remove all the old posts from Firebase. Now try to add posts after logging in with a valid email address and password. Once a few posts are created, try to log in as another user and you won't be able to see the posts created by the previous user.
Conclusion
In this tutorial, we saw how to add the Ladda loading indicator into our application to make our app more interactive. We also saw how to filter the data result while fetching data from Firebase. In the next part of this series, we'll implement the logout functionality and also fix a couple of existing issues.
Source code from this tutorial is available on GitHub. Do let us know your thoughts, corrections and suggestions in the comments below!

Comments