Introduction
In the first part of this series, we managed to get the start screen showing and were able to transition to the gamelevel screen. In this tutorial, we continue where we left of and start implementing the gameplay.
1. Local Variables
Open gamelevel.lua, the file we created in the first tutorial, and add the following below the line local scene = storyboard.newScene().
local playerSpeedY = 0
local playerSpeedX = 0
local playerMoveSpeed = 7
local playerWidth  = 60
local playerHeight = 48
local bulletWidth  = 8
local bulletHeight =  19
local islandHeight = 81
local islandWidth = 100
local numberofEnemysToGenerate = 0
local numberOfEnemysGenerated = 0
local playerBullets = {} -- Holds all the bullets the player fires
local enemyBullets = {} -- Hold the bullets from "all" enemy planes
local islands = {} --  Holds all the islands
local planeGrid = {} -- Holds 0 or 1 (11 of them for making a grid system)
local enemyPlanes = {}  -- Holds all of the enemy planes
local livesImages = {}  -- Holds all of the "free life" images
local numberOfLives = 3
local freeLifes = {} -- Holds all the ingame free lives
local playerIsInvincible = false
local gameOver = false
local numberOfTicks = 0 -- A number that is incremented each frame of the game
local islandGroup -- A group to hold all of the islands
local planeGroup -- A group that holds all the planes, bullets, etc
local player
local  planeSoundChannel -- SoundChannel for the plane sound
local firePlayerBulletTimer
local generateIslandTimer
local fireEnemyBulletsTimer
local generateFreeLifeTimer
local rectUp -- The "up" control on the DPAD
local rectDown -- The "down" control on the DPAD
local rectLeft -- The "left" control on the DPAD
local rectRight -- The "right" control on the DPAD
Most of these are self-explanatory, but I've included comments for clarification. From here on out, all code should be inserted above the line return scene.
2. createScene
Start by adding the createScene function to main.lua. The createScene function is called when the scene's view doesn't yet exist. We'll add the game's display objects in this function.
function scene:createScene( event )
    local group = self.view
end
scene:addEventListener( "createScene", scene )
3. setupBackground
function setupBackground ()
    local background = display.newRect( 0, 0, display.contentWidth, display.contentHeight)
    background:setFillColor( 0,0,1)
    scene.view:insert(background)
end
In setupBackground, we create a blue background using the Display object's newRect method. The setFillColor method takes RGB values, as percentages. Invoke the setupBackground function in createScene as shown below.
function scene:createScene( event )
    local group = self.view
    setupBackground()
end
4. setupGroups
The setupGroups function instantiates the islandGroup and planeGroup groups, and inserts them into the scene's view. The GroupObject is a special type of display object into which you can add other display objects. It's important to first add the islandGroup to the view to make sure the islands are below the planes.
function setupGroups()
    islandGroup = display.newGroup()
    planeGroup = display.newGroup()
    scene.view:insert(islandGroup)
    scene.view:insert(planeGroup)
end
Invoke the setupGroups function in createScene as shown below.
function scene:createScene( event )
    local group = self.view
    setupBackground()
    setupGroups()
end
5. setupDisplay
The setupDisplay function draws a black rectangle at the bottom of the screen and inserts dpad and plane images into the view.
function setupDisplay ()
    local tempRect = display.newRect(0,display.contentHeight-70,display.contentWidth,124);
    tempRect:setFillColor(0,0,0);
    scene.view:insert(tempRect)
    local logo = display.newImage("logo.png",display.contentWidth-139,display.contentHeight-70);
    scene.view:insert(logo)
    local dpad = display.newImage("dpad.png",10,display.contentHeight - 70)
    scene.view:insert(dpad)
end
Again, invoke this function in createScene as shown below.
function scene:createScene( event )
    local group = self.view
    setupBackground()
    setupGroups()
    setupDisplay()
end
6. setupPlayer
The setupPlayer function simply adds the player image to the screen. The Display object comes with two read-only properties, contentWidth and contentHeight, representing the original width and height of the content in pixels. These values default to the screen width and height, but may have other values if you're using
content scaling in config.lua. We use these properties to align the player in the scene.
function setupPlayer()
    player = display.newImage("player.png",(display.contentWidth/2)-(playerWidth/2),(display.contentHeight - 70)-playerHeight)
    player.name = "Player"
    scene.view:insert(player)
end
Invoke the setupPlayer function in createScene.
function scene:createScene( event )
    local group = self.view
    setupBackground()
    setupGroups()
    setupDisplay()
    setupPlayer()
end
7. setupLivesImages
The setupLivesImages function sets up six life images and positions them at the top left of the screen. We then insert these images into the livesImages table, so that we're able to reference them later. Lastly, we make sure that only the first three images are visible.
function setupLivesImages()
for i = 1, 6 do
      local tempLifeImage = display.newImage("life.png",  40* i - 20, 10)
      table.insert(livesImages,tempLifeImage)
      scene.view:insert(tempLifeImage)
      if( i > 3) then
           tempLifeImage.isVisible = false;
      end
end
end
The setupLivesImages function is also invoked in the createScene function.
function scene:createScene( event )
        local group = self.view
         setupBackground()
         setupGroups()
         setupDisplay()
         setupPlayer()
         setupLivesImages()
end
8. setupDPad
The setupDPad function sets up the four rectangles rectUp, rectDown, rectLeft, and rectRight. We carefully position them on top of the dpad image, configure them to not be visible, and make sure the isHitTestable property is set to true.
If you set display objects to not be visible, you're initially unable to interact with them. However, by setting the isHitTestable property to true, this behavior is overridden.
function setupDPad()
    rectUp = display.newRect( 34, display.contentHeight-70, 23, 23)
    rectUp:setFillColor(1,0,0)
    rectUp.id ="up"
    rectUp.isVisible = false;
    rectUp.isHitTestable = true;
    scene.view:insert(rectUp)

    rectDown = display.newRect( 34,display.contentHeight-23, 23,23)
    rectDown:setFillColor(1,0,0)
    rectDown.id ="down"
    rectDown.isVisible = false;
    rectDown.isHitTestable = true;
    scene.view:insert(rectDown)

    rectLeft = display.newRect( 10,display.contentHeight-47,23, 23)
    rectLeft:setFillColor(1,0,0)
    rectLeft.id ="left"
    rectLeft.isVisible = false;
    rectLeft.isHitTestable = true;
    scene.view:insert(rectLeft)

    rectRight= display.newRect( 58,display.contentHeight-47, 23,23)
    rectRight:setFillColor(1,0,0)
    rectRight.id ="right"
    rectRight.isVisible = false;
    rectRight.isHitTestable = true;
    scene.view:insert(rectRight)
end
You've guessed it. This function is also invoked in createScene.
function scene:createScene( event )
    local group = self.view
    setupBackground()
    setupGroups()
    setupDisplay()
    setupPlayer()
    setupLivesImages()
    setupDPad()
end
9. resetPlaneGrid
The resetPlaneGrid function resets the planeGrid table and inserts eleven zeros. The planeGrid table imitates eleven spots across the x axis, in which an enemy plane can be positioned. This will make more sense once we start generating enemy planes.
function resetPlaneGrid()
planeGrid = {}
     for i=1, 11 do
         table.insert(planeGrid,0)
     end
end
Invoke this function in createScene.
function scene:createScene( event )
    local group = self.view
    setupBackground()
    setupGroups()
    setupDisplay()
    setupPlayer()
    setupLivesImages()
    setupDPad()
    resetPlaneGrid()
end
10. enterScene
Now that all the display objects are in place, it's time to add event listeners, timers, etc. If you recall from the previous part of this tutorial, the enterScene function is a good place to set these up. Start by inserting the following code snippet.
function scene:enterScene( event )
    local group = self.view
end
scene:addEventListener( "enterScene", scene )
11. Removing the Previous Storyboard
When we enter this scene, we need to remove the previous scene. Add the following code to the enterScene function to do this.
local previousScene = storyboard.getPrevious()
storyboard.removeScene(previousScene)
When you enter a new scene, the previous scene you were on can be referenced by calling
getPrevious on the storyboard object. We remove it completely from the storyboard by calling removeScene on the storyboard object.12. Add Event Listeners to Dpad Rectangles
Add the following code below the code you entered in the previous step. This code snippet adds touch listeners to each of the rectangles, invoking movePlane with every touch. Let's take a look at this movePlane function in the next step.
rectUp:addEventListener( "touch", movePlane)
rectDown:addEventListener( "touch", movePlane)
rectLeft:addEventListener( "touch", movePlane)
rectRight:addEventListener( "touch", movePlane)
13. movePlane
The movePlane function is responsible for setting the planes speed. We check if the touch event's phase is equal to began, which means the player has touched down but not lifted their finger back up. If this is true, we set the speed and direction according to which rectangle was touched. If the touch event's phase is equal to ended, then we know the player has lifted their finger, which means we set the speed to 0.
function movePlane(event)
    if event.phase == "began" then
        if(event.target.id == "up") then
          playerSpeedY = -playerMoveSpeed
        end
        if(event.target.id == "down") then
          playerSpeedY = playerMoveSpeed
        end
        if(event.target.id == "left") then
          playerSpeedX = -playerMoveSpeed
        end
        if(event.target.id == "right") then
          playerSpeedX = playerMoveSpeed
        end
    elseif event.phase == "ended" then
        playerSpeedX = 0
        playerSpeedY = 0
   end
end
14. PlaneSound
Let's add some sound to our game. Add the following code snippet to the enterScene function. It loads and plays planesound.mp3. By setting the loops property to -1, the sound will loop forever. If you want to learn more about audio in Corona, be sure to check out the documentation.
local planeSound = audio.loadStream("planesound.mp3")
planeSoundChannel = audio.play( planeSound, {loops=-1} )
15. enterFrame Event
We also add a runtime event listener named enterFrame that will call the gameLoop function. The frequency with which the enterFrame event occurs depends on the frames per second (FPS) value you set in config.lua. In our example, it will be called 30 times per second. Add this event listener in the enterScene function.
Runtime:addEventListener("enterFrame", gameLoop)
16. gameLoop
In the gameLoop function we update the sprite positions and perform any other logic that needs to take place every frame. If you are interested in reading more on the topic of game loops, Michael James Williams wrote a great article that explains how a common game loop works. Add the following code snippet.
function gameLoop()
    movePlayer()
end
17. movePlayer
The movePlayer function manages the moving of the player's plane. We move the plane according to the playerSpeedX and playerSpeedY values, which will either be 7 or 0, depending on whether the player is touching on the DPad or not. Refer back to the movePlane function if this is unclear. We also do some bounds checking, making sure the plane cannot move off-screen.
function movePlayer()
    player.x = player.x + playerSpeedX
    player.y = player.y + playerSpeedY
    if(player.x < 0) then
        player.x = 0
   end
   if(player.x > display.contentWidth - playerWidth) then
       player.x = display.contentWidth - playerWidth
   end
   if(player.y   < 0) then
       player.y = 0
  end
  if(player.y > display.contentHeight - 70- playerHeight) then
      player.y = display.contentHeight - 70 - playerHeight
  end
end
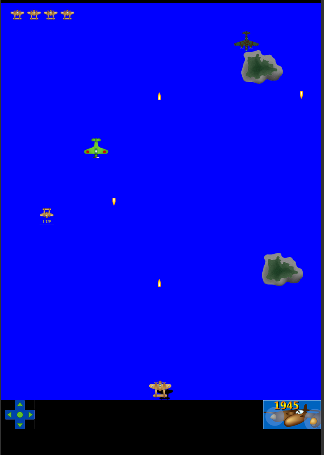
If you test the game now, you should be able to navigate the plane around the screen using the DPad.
Conclusion
This brings the second tutorial of this series to a close. In the next installment of this series, we will continue with the gameplay. Thanks for reading and see you there.

Comments