I am a big fan of Parse, a technology that makes developing web and mobile apps faster. It lets you store, sync and push data in the cloud without writing a line of server-side code. Read on to see how you can integrate Parse in your next project.
A Bit of Background
Interacting with the database is extremely painless!
Let's take a step back and evaluate where web development was five years ago. We were using languages such as PHP/Ruby on the back-end that interacted with relational databases (such as MySQL), and our front-end was littered with various JavaScript files. I don't know about you, but most of my projects were on some server with a small amount of disk space, RAM and bandwidth.
A lot of new technologies leverage the cloud, and it's not uncommon to see developers taking advantage of these cost-effective services, such as AWS, Amazon S3, Heroku, and more. The introduction of these services essentially altered the web development landscape; more of what we do resides in the cloud.
Today, we're going to look at Parse, a startup that offers a cloud-based data management system. By leveraging their service, I was able to rapidly create new mobile and web apps. We're going to use Parse to create the obligatory To-do web application, and I hope it gives you a taste of what the service can offer.
What's Parse?
Simply put, Parse is a cloud-based data management system that allows you to quickly develop web and mobile apps.
It makes developing apps really easy by taking the back-end out of your hands.
So, how's this work? Well, let's assume you're a web developer. You can add the Parse JavaScript file on your page, get an API key, and start saving "objects" in the cloud with only a few lines of code. Parse frees you from setting up a server-side stack.
Think about this for a minute. Traditionally, you set up a server-side stack (LAMP, or RoR, ASP.NET, or something else), set up a database, and then interact with it via Ajax on the client. Parse just reduced all that work to a few lines of code.
In this tutorial, we'll use Parse's JavaScript SDK. You're not limited to using only JavaScript, however; there are Parse libraries in many different languages, including PHP, NodeJS, Java, C# and more. You can find all the available libraries here.
Using Parse for Your Web-based Projects
Before we start, let's take a minute and think how a traditional To-do list app could be created using a LAMP stack.
- You would create a MySQL database.
- You may have a PHP class that is responsible for performing CRUD operations. Optionally, you could just have a bunch of PHP functions.
- You may use JavaScript and Ajax on the client-side to call the respective PHP scripts and pass in query strings.
- You would need to sanitize the input to protect against XSS attacks, as well as worry about database security in general.
- If a collaborative app, you would need to track different users and manage their lists. More code, more tables, and more schemas.
- You would need to make sure your database stays performant.
You get the idea. There's a lot to think about and many areas to make mistakes. Parse handles these issues for us.
Create a Parse Account
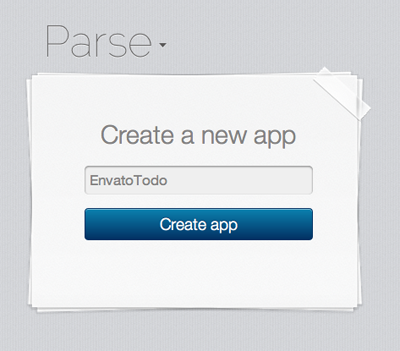
Before you do anything, create a free Parse account. Then create a new app called EnvatoTodo.
Download the Empty Project
Parse provides a great QuickStart guide to help you get started. Select JavaScript and choose EnvatoTodo from the drop down menu in step 2 (shown in the image below). Parse will generate a zip file that contains the Parse SDK and index.html.

The Client-Side
Before we start interacting with Parse, let's set up a basic client-side structure for our application. Since the UI is not the focus of this application, I'll just show you the code that I used. It's nothing fancy, but I'm using YUI3. You could optionally use jQuery. Everything is in index.html.
<!DOCTYPE html>
<head>
<meta charset="utf-8">
<title>Todo App Built on Parse</title>
<meta name="description" content="My Parse App">
<meta name="viewport" content="width=device-width">
<link rel="stylesheet" href="css/reset.css">
<link rel="stylesheet" href="css/styles.css">
<script src="http://yui.yahooapis.com/3.6.0/build/yui/yui-min.js"></script>
<script type="text/javascript" src="http://www.parsecdn.com/js/parse-1.0.19.min.js"></script>
<style>
body {
font-family: "HelveticaNeue-Light", sans-serif;
font-weight:300;
}
h2 {
font-size:16px;
text-transform:uppercase;
}
a {
text-decoration:none;
}
.hidden {
display:none;
}
#main {
text-align:center;
}
input {
padding: 10px;
border-radius: 3px;
border:1px solid #ccc;
box-shadow: inset 0 0 10px #eee;
font-size:24px;
}
#input-wrapper {
padding-bottom:15px;
}
#list-item-submit {
background: #73D175;
color: white;
box-shadow:none;
border-color: #599E5A;
}
li {
text-align:left;
font-family:sans-serif;
list-style: none;
padding: 10px 0;
border-bottom:1px solid #ccc;
margin-left:-10px;
}
li input {
margin-right:15px;
}
</style>
</head>
<body>
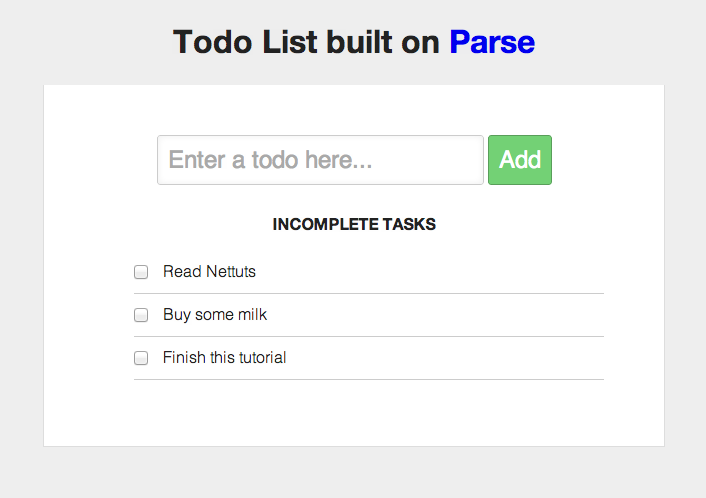
<h1>Todo List built on <a href="http://www.parse.com" alt="Parse">Parse</a></h1>
<div id="main">
<div id="input-wrapper">
<input type="text" id="list-input" placeholder="Enter a todo here...">
<input type="button" id="list-item-submit" value="Add">
</div>
<div>
<h2>Incomplete Tasks</h2>
<ul id="incomplete-items">
<li id="no-incomplete-message">There are no incomplete tasks! Consider adding one above.</li>
</ul>
</div>
</div>
<!-- This is a template that we'll be using to populate our list items -->
<script id="todo-items-template" type="x/handlebars">
<li class="list-item"><input type="checkbox" id="{id}">{content}</li>
</script>
<script>
//Use the YUI 'node' module.
YUI().use('node', function(Y) {
//Lets declare some variables that we'll be using.
var ListItem,
query,
noTasksMessage = Y.one('#no-incomplete-message'),
submitBtn = Y.one("#list-item-submit"),
incompleteItemList = Y.one('#incomplete-items'),
completeItemList = Y.one('#complete-items'),
input = Y.one("#list-input");
//The rest of our application code will go below.
submitBtn.on('click', function(e) {
/*
When the submit button is clicked, we want to get the contents of the input and save a new todo list item.
*/
});
/*
When a <li> is clicked, we want to save that item as being complete. We use 'delegate' here instead of 'on' so that we only create one event listener instead of one for each checkbox.
*/
incompleteItemList.delegate('click', function(e) {
}, 'li');
/* We also want to get the 10 most recent incomplete tasks and add them to <div id="incomplete-items"></div> */
});
</script>
</body>
</html>
The important thing to note in the above code is the inclusion of the Parse JavaScript file, <script src="http://www.parsecdn.com/js/parse-1.0.19.min.js"></script>. This file contains the Parse object that we will interact with.
Add Classes in the Data Browser
Parse frees you from setting up a server-side stack.
Let's get back to Parse. View the Data Browser for EnvatoTodo (it's currently empty). The Data Browser is similar to a MySQL database server, but the Parse DB is schema-less. While you can specify columns in the Data Browser, you can actually save any object with simple JSON (not unlike many NoSQL/Document databases). This is an extremely important and useful feature of Parse.
We're going to go ahead and add a "class" to the database. Think of a class as a table. The reason it's called a class is because you'll generally create objects from a certain class and then save that object to the database.
Disclaimer: JavaScript does not officially have classes (yet), but it does have the logical equivalent. For the sake of simplicity, I will use the terminology "class" in this tutorial.
Parse has five types of classes.
-
User classes store user-specific information, and Parse provides sugar methods such as
signUp(),login(), and more to help with user administration. - Installation classes are typically used to send push notifications for mobile apps. Yes, Parse supports push notifications to all clients.
- Role classes help segregate users into specific roles, controlling access to read/write to other classes. This is called ACL (access control list) within Parse.
- Product classes store in-app product data.
- Custom classes are for anything else.
Let's create a custom class called ListItem. Once it's created, you'll notice it already has four properties. Parse automatically updates the properties of every class that you create. Some classes, such as user classes, may have their own specific properties.
Our ListItem objects will contain a content property to show what the Todo contains, and an isComplete property to indicate whether the Todo was completed. We could add columns for these properties, but Parse will figure it out from our JSON.
Initializing Parse
Let's go back to index.html to add some code. The first thing we want to do is initialize Parse with our App ID and JavaScript key. These can be found under the Overview tab of your application inside the Data Browser. Add the following line to your JavaScript, replacing APP_ID and JS_KEY with the appropriate values:
Parse.initialize(APP_ID, JS_KEY);
Saving Todos
Let's start adding functionality to our application. We'll first save a To-do list item when the user clicks the add button. The following code is all we need for this functionality:
submitBtn.on('click', function(e) {

    //Extend the native Parse.Object class.
    var ListItem = Parse.Object.extend("ListItem");

    //Instantiate an object of the ListItem class
    var listItem = new ListItem();

    //listItem is now the object that we want to save, so we assign the properties that we want on it.
    listItem.set("content", text);
    listItem.set("isComplete", false);

    //We call the save method, and pass in success and failure callback functions.
    listItem.save(null, {
        success: function(item) {
        //Success Callback
    },
    error: function(gameScore, error) {
        //Failure Callback
    }
    });
});
Interacting with the database is extremely painless! Every custom class in Parse inherits from Parse.Object; therefore, ListItem is a subclass. The string argument "ListItem" tells Parse that this class correlates to the ListItem table that we created. Then we create a new ListItem object, set its properties, and call save().
Showing Items
In order to display a list of To-do items, we'll use the Parse JavaScript API to query the ten most recently saved items, and list those below the app. This will give you an idea as to how queries work in Parse.
//Once again, we extend the Parse.Object class to make the ListItem class
ListItem = Parse.Object.extend("ListItem");

//This time, we use Parse.Query to generate a new query, specifically querying the ListItem table.
query = new Parse.Query(ListItem);

//We set constraints on the query.
query.equalTo('isComplete', false)
query.limit = 10;
query.descending('createdAt');

//We submit the query and pass in callback functions.
query.find({
  success: function(results) {
    //Success callback
  },
  error: function(error) {
    //Error Callback
  }
});
Once again, it's fairly simple and easy to read. The Parse.Query() method is quite powerful. Here, we perform a fairly basic query, but Parse queries can be complex as well. You can query for specific regular expressions, perform relational queries, and many more. Be sure to visit the Query Documentation for more examples and code snippets.
Putting it all together
The next thing we need to add is the ability to mark a to-do item as complete when checking the item's checkbox. Each checkbox has a unique id associated with the Parse object that it represents. Therefore, when a checkbox is clicked, we need to:
- Get the id.
- Query for a Parse object with that id.
- Get the returned Parse object, and update it's
isCompleteproperty astrue. - Save the updated object.
- Remove it from the displayed list.
Here's what that code looks like:
incompleteItemList.delegate('click', function (e) {

    //keep a reference to this
    var self = this;

    //create a Parse query object
    var query = new Parse.Query(ListItem);

    //The query.get() method requires the objectId as its first argument. It returns the object with that id.
    query.get(self.one('input').get('id'), {
      success: function(item) {

        //Once the object is returned, we update its property and save it.
        item.set('isComplete', true);
            item.save();

            //Since the item is no longer incomplete, we remove it from the list.
            self.remove();

            //If there's nothing in the list, show a message saying the list is empty.
            if (incompleteItemList.all('li').size() >= 1) {
                noTasksMessage.removeClass('hidden');
            }

      },
      error: function(object, error) {
            alert("Error when updating todo item: " + error.code + " " + error.message);
      }
    });
}, 'li');
In this snippet, we query for an individual element with a specific id, update it, and save it. Then we remove it from the list with self.remove().
In Parse, updating objects is very similar to saving objects--we call save() in both cases. Parse figures out whether it's an existing (dirty) object, or an entirely new object and performs the appropriate action.
Complete Source Code
With that, we're good to go! Pretty easy, eh? Download the attached ZIP file and open index.html to view the entire source code.
Other Features
In this tutorial, we primarily looked at Parse from a web development point-of-view. However, the service was originally started with mobile developers in mind. Parse has a very thorough SDK for Android and iOS, and it supports features such as push notifications to all users of your mobile app.
Some other big features that we didn't cover in this tutorial involve users, roles, and storing relational information.
Parse makes it relatively simple to create users, and assign different roles to them. For example, in a learning management system, you may have "Teachers", "Students", and "Administrators". By assigning roles, you can specify which type of user has access to certain Parse objects.
What about Security?
A lot of new technologies leverage the cloud...
As a developer, I like that Parse takes care of a lot of the security concerns that I have. As it states on the website, the Parse SDKs are designed "so that you typically don't need to worry about how data is saved." There's still the issue of users having access to information that they shouldn't be able to. To address this concern, Parse offers Object-level and Class-level permissions.
Object-level permissions allow a developer to specify an array of object IDs that have access to read and/or write the object. Class-level permissions allow a developer to specify what aspects of a Parse class can be manipulated from the API. The following operations can be allowed or denied on a per-class basis: Get, Find, Update, Create, Delete, and Add Fields.
Pros and Cons
I want to stress is that Parse is not suitable for every type of project. Although the free plan is very generous, Parse is a paid service. It can get expensive if you go above certain limits. Luckily, the pricing model is very transparent, and you should be able to figure out how much your app can cost. Generally speaking, I use it for smaller projects where I can anticipate a certain cap when it comes to the number of API requests that I make. I have yet to try Parse for a large project.
One common issue with a service such as Parse is the lock-in effect.
If you use Parse for a small project that suddenly takes off, it can be difficult to move to a difference service or platform. As you can imagine, replacing Parse with your own back-end would entail a significant amount of refactoring. This doesn't mean you shouldn't use Parse, but it's something to keep in mind.
Concluding Remarks
In this tutorial, we looked at how we can use Parse to create a relatively simple web application. I've used this service for a number of projects for various clients, and I find the Parse team to be very helpful when issues arise. I encourage you give the service a try, and make your own decision!
Disclosure: I have no relationship with Parse or any of its employees. I'm just a developer who uses their service, and I find it to be a helpful addition to my development workflow.

Comments