In the previous part of this series, we implemented paging for the wish list on the user home page. In this part of the series, we'll implement an option for the user to upload an image representing a wish, an option to mark the wish as accomplished, and an option to set privacy.
Getting Started
Let's start by cloning the previous part of the tutorial from GitHub.
git clone https://github.com/jay3dec/PythonFlaskMySQLApp_Part5.git
Once the source code has been cloned, navigate to the project directory and start the web server.
cd PythonFlaskMySQLApp_Part5
python app.py
Point your browser to http://localhost:5002/ and you should have the application running.
Modifying the User Interface
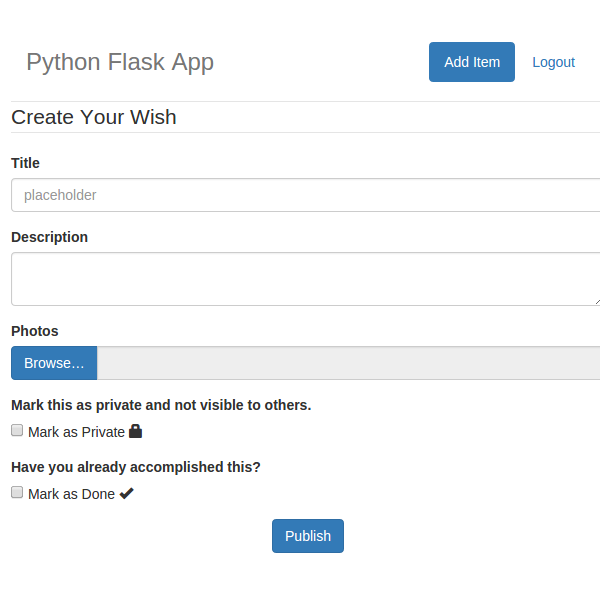
Let's start by modifying our "add wish" page to include an option to upload an image. Navigate to templates/addWish.html. Our form in addWish.html looks quite small, so let's modify the bootstrap HTML code to make the form vertical.
First, we'll modify the form-horizontal to a vertical form, so remove the class form-horizontal from the form. We'll also add three new controls: a file upload control to upload photos, a check box to mark the wish as private, and another check box to mark the wish as completed. Here is the modified addWish.html.
<!DOCTYPE html>
<html lang="en">
<head>
<title>Python Flask Bucket List App</title>
<link rel="stylesheet" href="https://maxcdn.bootstrapcdn.com/bootstrap/3.3.2/css/bootstrap.min.css">
<link href="http://getbootstrap.com/examples/jumbotron-narrow/jumbotron-narrow.css" rel="stylesheet">
<script src="../static/js/jquery-1.11.2.js"></script>
<style>
.btn-file {
position: relative;
overflow: hidden;
}
.btn-file input[type=file] {
position: absolute;
top: 0;
right: 0;
min-width: 100%;
min-height: 100%;
font-size: 100px;
text-align: right;
filter: alpha(opacity=0);
opacity: 0;
outline: none;
background: white;
cursor: inherit;
display: block;
}
</style>
</head>
<body>
<div class="container">
<div class="header">
<nav>
<ul class="nav nav-pills pull-right">
<li role="presentation" class="active"><a href="#">Add Item</a>
</li>
<li role="presentation"><a href="/logout">Logout</a>
</li>
</ul>
</nav>
<h3 class="text-muted">Python Flask App</h3>
</div>
<form role="form" method="post" action="/addWish">
<!-- Form Name -->
<legend>Create Your Wish</legend>
<!-- Text input-->
<div class="form-group">
<label for="txtTitle">Title</label>
<input id="txtTitle" name="inputTitle" type="text" placeholder="placeholder" class="form-control input-md">
</div>
<!-- Textarea -->
<div class="form-group">
<label for="txtPost">Description</label>
<textarea class="form-control" id="txtPost" name="inputDescription"></textarea>
</div>
<div class="form-group">
<label for="txtPost">Photos</label>
<div class="input-group">
<span class="input-group-btn">
<span class="btn btn-primary btn-file">
Browse… <input type="file" id="fileupload" name="file" multiple>
</span>
</span>
<input type="text" class="form-control" readonly>
</div>
</div>
<div class="form-group">
<label>Mark this as private and not visible to others.</label>
<br/>
<input type="checkbox"> Mark as Private <span class="glyphicon glyphicon-lock" aria-hidden="true"></span>
</div>
<div class="form-group">
<label>Have you already accomplished this?</label>
<br/>
<input type="checkbox"> Mark as Done <span class="glyphicon glyphicon-ok" aria-hidden="true"></span>
</div>
<!-- Button -->
<div class="form-group">
<p class="text-center">
<input id="singlebutton" name="singlebutton" class="btn btn-primary" type="submit" value="Publish" />
</p>
</div>
</form>
<footer class="footer">
<p>© Company 2015</p>
</footer>
</div>
</body>
</html>
Save the above change and restart the server. After signing in successfully, click on the Add Wish link and you should be able to see the modified add wish page.
Implementing Upload Functionality
We'll be using blueimp jQuery-File-Upload to implement the file upload functionality. Download the required the files from GitHub. Extract the source and add the following script references to addWish.html.
<script src="../static/js/jquery-1.11.2.js"></script>

<script src="../static/js/jquery.ui.widget.js"></script>

<script type="text/javascript" src="../static/js/jquery.fileupload.js"></script>

<script type="text/javascript" src="../static/js/jquery.fileupload-process.js"></script>

<script type="text/javascript" src="../static/js/jquery.fileupload-ui.js"></script>
On addWish.html page load, add the plugin initiation code to the file upload button click.
$(function() {
    $('#fileupload').fileupload({
        url: 'upload',
        dataType: 'json',
        add: function(e, data) {
            data.submit();
        },
        success: function(response, status) {
            console.log(response);
        },
        error: function(error) {
            console.log(error);
        }
    });
})
As seen in the above code, we have attached the file upload plugin to the #fileupload button. The file upload plugin posts the file to the /upload request handler, which we'll define in our Python code. We have also defined an add function to submit the data, and defined success and failure callbacks to handle the upload success and failures.
Next, let's define the upload Python file upload handler in app.py. Define a route /upload as shown:
@app.route('/upload', methods=['GET', 'POST'])
def upload():
    # file upload handler code will be here
Check if the request is a POST request, and if so read the file from request.
if request.method == 'POST':
        file = request.files['file']
We'll also need to get the image file extension to save the file. So import os and then split the extension name from the file name.
extension = os.path.splitext(file.filename)[1]
Once we have the file extension, we'll create a new unique file name using uuid. Import uuid and create the file name.
f_name = str(uuid.uuid4()) + extension
Create a folder called Uploads in the static folder. This is where we'll keep the uploaded images. Add the path to the Upload folder in the app configuration.
app.config['UPLOAD_FOLDER'] = 'static/Uploads'
Now save the posted file into the UPLOAD_FOLDER location and return the file name as a response.
file.save(os.path.join(app.config['UPLOAD_FOLDER'], f_name))
return json.dumps({'filename':f_name})
Save the above changes and restart the server. Point your browser to the http://localhost:5002 and sign in using valid credentials. Try to upload an image using the browse button, and when done, check your browser console. You should be able to see the returned uploaded file name.
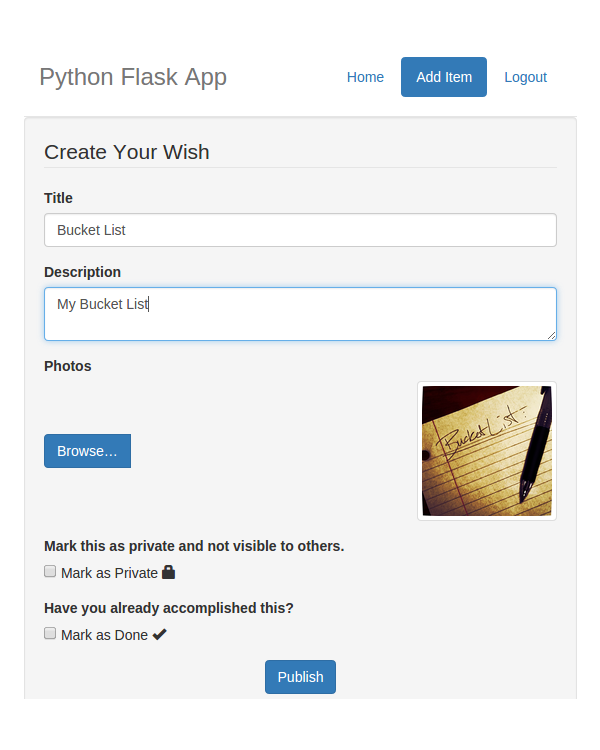
Instead of the read-only input text field, let's add an image element to display the uploaded image. So replace the read-only input text field with the following HTML code.
<div class="pull-right">
    <img id="imgUpload" style="width: 140px; height: 140px;" class="img-thumbnail">
</div>
In the file upload success callback, update #imgUpload's src to the uploaded image.
$('#imgUpload').attr('src','static/Uploads/'+response.filename);
Save the above changes and restart the server. Sign in to the application and try to upload a new image file, and you should be able to see the uploaded image.
We'll need to modify our tbl_wish table structure to include three new fields. Alter the tbl_wish as shown below:
ALTER TABLE `BucketList`.`tbl_wish`
ADD COLUMN `wish_file_path` VARCHAR(200) NULL AFTER `wish_date`,
ADD COLUMN `wish_accomplished` INT NULL DEFAULT 0 AFTER `wish_file_path`,
ADD COLUMN `wish_private` INT NULL DEFAULT 0 AFTER `wish_accomplished`;
Next let's modify our stored procedures sp_addWish and sp_updateWish to include the newly added fields to the database.
Modify the sp_addWish stored procedure to include the three newly added fields.
USE `BucketList`;
DROP procedure IF EXISTS `sp_addWish`;

DELIMITER $$
USE `BucketList`$$
CREATE DEFINER=`root`@`localhost` PROCEDURE `sp_addWish`(
    IN p_title varchar(45),
	IN p_description varchar(1000),
	IN p_user_id bigint,
	IN p_file_path varchar(200),
	IN p_is_private int,
	IN p_is_done int
)
BEGIN
	insert into tbl_wish(
		wish_title,
		wish_description,
		wish_user_id,
		wish_date,
		wish_file_path,
		wish_private,
		wish_accomplished
	)
	values
	(
		p_title,
		p_description,
		p_user_id,
		NOW(),
		p_file_path,
		p_is_private,
		p_is_done
	);
END$$

DELIMITER ;
Also modify the stored procedure sp_updateWish to include the three newly added fields.
USE `BucketList`;
DROP procedure IF EXISTS `sp_updateWish`;

DELIMITER $$
USE `BucketList`$$
CREATE DEFINER=`root`@`localhost` PROCEDURE `sp_updateWish`(
IN p_title varchar(45),
IN p_description varchar(1000),
IN p_wish_id bigint,
In p_user_id bigint,
IN p_file_path varchar(200),
IN p_is_private int,
IN p_is_done int
)
BEGIN
update tbl_wish set
    wish_title = p_title,
	wish_description = p_description,
	wish_file_path = p_file_path,
	wish_private = p_is_private,
	wish_accomplished = p_is_done
	where wish_id = p_wish_id and wish_user_id = p_user_id;
END$$

DELIMITER ;
Next, modify the /addWish request handler's method to read the newly posted fields and pass them to the stored procedure.
if request.form.get('filePath') is None:
    _filePath = ''
else:
    _filePath = request.form.get('filePath')

if request.form.get('private') is None:
    _private = 0
else:
    _private = 1

if request.form.get('done') is None:
    _done = 0
else:
    _done = 1
Once the values have been read, we'll pass them to the MySQL stored procedure call.
cursor.callproc('sp_addWish',(_title,_description,_user,_filePath,_private,_done))
In the addWish.html page we'll need to set the name attribute for the elements to be posted. So add name to both the newly-added check boxes.
<input name="private" type="checkbox"> Mark as Private <span class="glyphicon glyphicon-lock" aria-hidden="true"></span>

<input name="done" type="checkbox"> Mark as Done <span class="glyphicon glyphicon-ok" aria-hidden="true"></span>
Now we also need to pass the upload file path. So we'll create a hidden input field and set its value in the file upload success callback.
<input type="hidden" name="filePath" id="filePath"></input>
Set its value in the file upload success callback.
success: function(response, status) {

    var filePath = 'static/Uploads/' + response.filename;
    $('#imgUpload').attr('src', filePath);

    $('#filePath').val(filePath);

}
Save the above changes and restart the server. Sign in using valid credentials and try to add a new wish with all the required details. Once added successfully, it should be listed on the user home page.
Modify the Edit Wish Implementation
First, we need to add some HTML code for the three new fields. So open up userHome.html and add the following HTML code after the title and description HTML.
<div class="form-group">
<label for="txtPost">Photos</label>
<div class="input-group">
<span class="input-group-btn">
<span class="btn btn-primary btn-file">
Browse… <input type="file" id="fileupload" name="file" multiple>
</span>
</span>
<div class="pull-right">
<img id="imgUpload" style="width: 140px; height: 140px;" class="img-thumbnail">
<input type="hidden" name="filePath" id="filePath"></input>
</div>
</div>
</div>
<div class="form-group">
<label>Mark this as private and not visible to others.</label>
<br/>
<input id="chkPrivate" name="private" type="checkbox"> Mark as Private <span class="glyphicon glyphicon-lock" aria-hidden="true"></span>
</div>
<div class="form-group">
<label>Have you already accomplished this?</label>
<br/>
<input id="chkDone" name="done" type="checkbox"> Mark as Done <span class="glyphicon glyphicon-ok" aria-hidden="true"></span>
</div>
We'll need to fetch the required data to populate the above fields on edit. So let's modify the stored procedure sp_GetWishById to include the additional fields as shown:
CREATE DEFINER=`root`@`localhost` PROCEDURE `sp_GetWishById`(
IN p_wish_id bigint,
In p_user_id bigint
)
BEGIN
select wish_id,wish_title,wish_description,wish_file_path,wish_private,wish_accomplished from tbl_wish where wish_id = p_wish_id and wish_user_id = p_user_id;
END
Next, we'll need to modify the JSON string in the /getWishById route method to include the new fields. Modify the wish list in /getWishById as shown:
wish.append({'Id':result[0][0],'Title':result[0][1],'Description':result[0][2],'FilePath':result[0][3],'Private':result[0][4],'Done':result[0][5]})
To render the result, we need to parse the data received in the success callback of the Edit JavaScript function in userHome.html.
success: function(res) {

    var data = JSON.parse(res);

    $('#editTitle').val(data[0]['Title']);

    $('#editDescription').val(data[0]['Description']);

    $('#imgUpload').attr('src', data[0]['FilePath']);

    if (data[0]['Private'] == "1") {
        $('#chkPrivate').attr('checked', 'checked');
    }

    if (data[0]['Done'] == "1") {
        $('#chkDone').attr('checked', 'checked');
    }

    $('#editModal').modal();

}
Save the changes and restart the server. Sign in using valid credentials, and when on the user home page, try to edit a wish from the wish list. You should have the data populated in the Edit popup.

Now, similar to what we did on the add wish page, add the jQuery-File-Upload script reference in userHome.html.
<script src="../static/js/jquery-1.11.2.js"></script>

<script src="../static/js/jquery.ui.widget.js"></script>

<script type="text/javascript" src="../static/js/jquery.fileupload.js"></script>

<script type="text/javascript" src="../static/js/jquery.fileupload-process.js"></script>

<script type="text/javascript" src="../static/js/jquery.fileupload-ui.js"></script>
Initialize the file upload control in the edit popup using the same code we used on the add wish page.
$(function() {
    $('#fileupload').fileupload({
        url: 'upload',
        dataType: 'json',
        add: function(e, data) {
            data.submit();
        },
        success: function(response, status) {

            var filePath = 'static/Uploads/' + response.filename;
            $('#imgUpload').attr('src', filePath);
            $('#filePath').val(filePath);

        },
        error: function(error) {
            console.log(error);
        }
    });
})
Next we need to modify the Update button click in the Edit popup to include the extra fields added. So, in the btnUpdate button click, modify the data parameters passed to include the three new fields as shown:
data : {title:$('#editTitle').val(),description:$('#editDescription').val(),id:localStorage.getItem('editId'),filePath:$('#imgUpload').attr('src'),isPrivate:$('#chkPrivate').is(':checked')?1:0,isDone:$('#chkDone').is(':checked')?1:0}
Open up app.py and modify the /updateWish request handler method to parse the newly added fields.
_filePath = request.form['filePath']
_isPrivate = request.form['isPrivate']
_isDone = request.form['isDone']
Modify the procedure calling method to include the extra parameters.
cursor.callproc('sp_updateWish',(_title,_description,_wish_id,_user,_filePath,_isPrivate,_isDone))
Now open up sp_updateWish and modify it to include the newly added fields.
DELIMITER $$

CREATE DEFINER=`root`@`localhost` PROCEDURE `sp_updateWish`(
IN p_title varchar(45),
IN p_description varchar(1000),
IN p_wish_id bigint,
In p_user_id bigint,
IN p_file_path varchar(200),
IN p_is_private int,
IN p_is_done int
)
BEGIN
update tbl_wish set
    wish_title = p_title,
	wish_description = p_description,
	wish_file_path = p_file_path,
	wish_private = p_is_private,
	wish_accomplished = p_is_done
	where wish_id = p_wish_id and wish_user_id = p_user_id;
END
Save all the above changes and restart the server. Sign in using valid credentials and try to edit and update the existing entries.
Wrapping It Up
In this part of the tutorial series, we saw how to integrate and use the blueimp jQuery-File-Upload plugin to upload images in our Python Flask application. In the next part of this series, we'll show the wishes accomplished by users on the application home page and add the functionality to like the wishes.
Do let us know your thoughts, corrections and suggestions in the comments below. Source code from this tutorial is available on GitHub.

Comments